Cultural and Historical Introduction
There is one aroma capable of transforming any home into an oasis of warmth in an instant — the aroma of chocolate cookies baking in the oven. That scent that sneaks from the kitchen to the living room, climbs the stairs, and knocks on closed bedroom doors to tell everyone inside: “Come, something wonderful is waiting for you.” This aroma is not merely a chemical result of sugar, butter, and flour reacting in the heat of the oven — it is part of a shared collective memory for millions of people around the world, even though its roots run deepest in American home and popular culture more than anywhere else.
American chocolate cookies — or what is known as “Chocolate Chip Cookies” — are not just one dessert among dozens. They are the quintessential American sweet, the dish that mothers teach their daughters in the kitchen as a rite of passage from childhood to a new stage, the treat that children carry to school in decorated metal tins on special occasions, and the piece that fathers dunk into a glass of cold milk in front of the television on quiet Sunday evenings. They are present at neighborhood parties, birthday celebrations, charity bake sales, Scout stands on American suburban sidewalks, and in every café from Seattle to Miami.
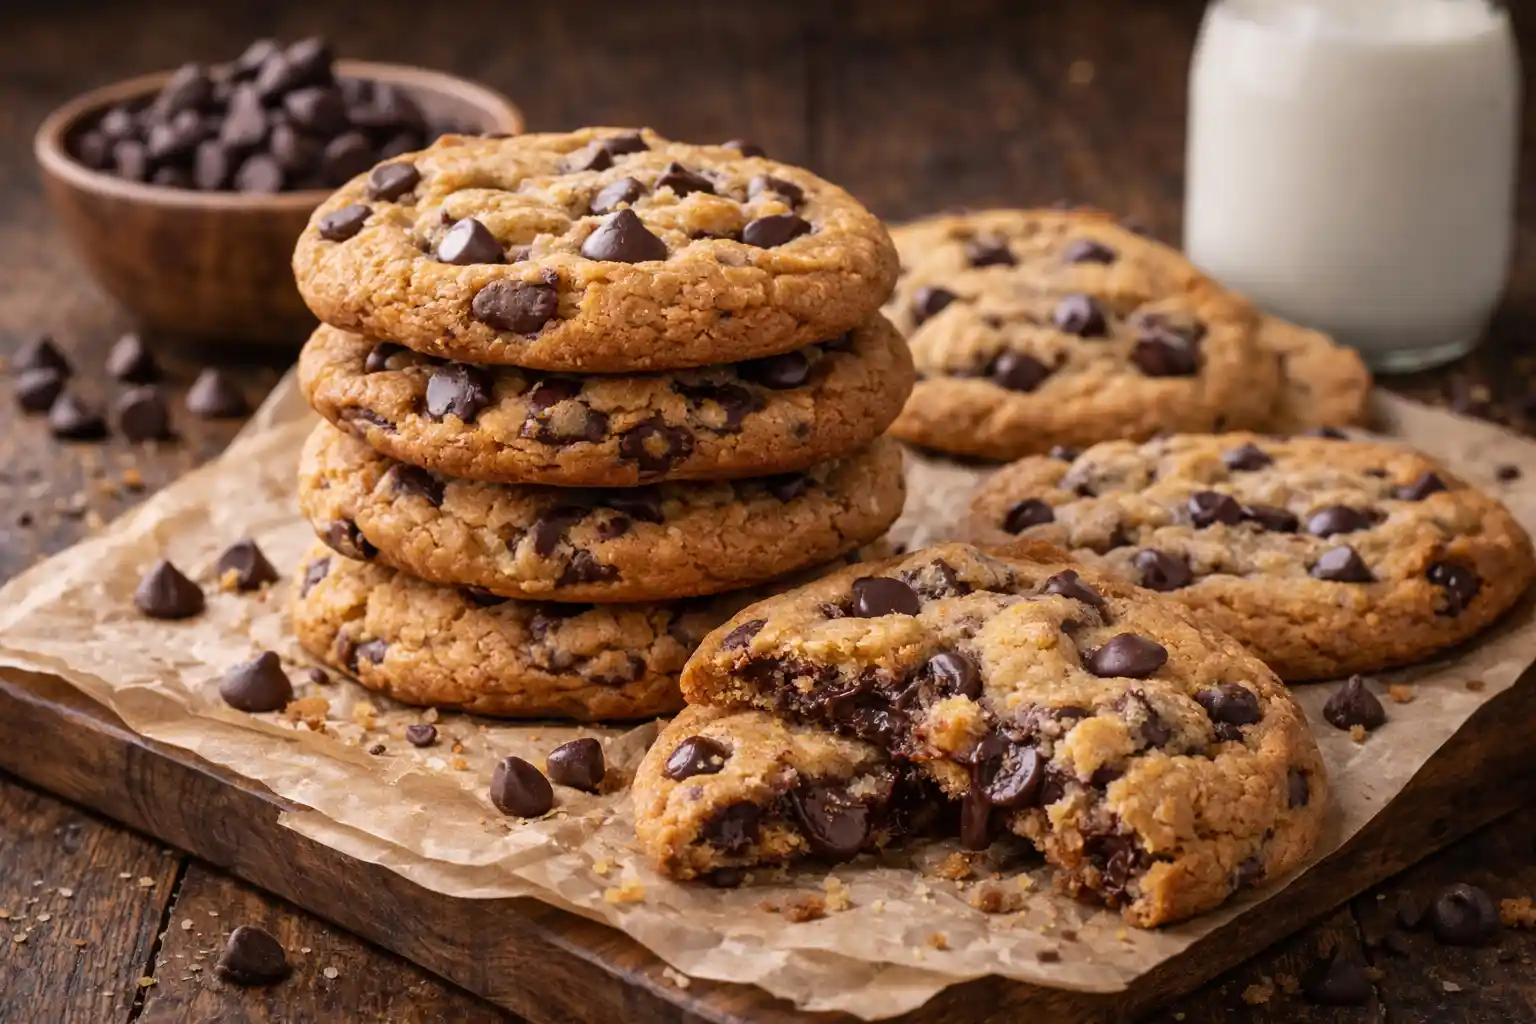
What distinguishes a great chocolate chip cookie from an ordinary one is that magical balance between two contradictory textures coexisting in a single piece: crispy golden edges that break under the teeth with a satisfying lightness, and a soft, moist inner center that melts on the tongue carrying with it hot pockets of melted chocolate. Achieving this balance is not a matter of luck — it is a precise science that depends on the quality of the ingredients first and foremost: high-quality chocolate with a carefully considered cocoa percentage, real fresh butter with its full fat content and creamy flavor, fresh eggs at room temperature, and moist brown sugar that cradles in its granules that warm caramel taste which gives the cookies their soul.
According to Atayeb, American chocolate chip cookies are among the classic desserts that combine a soft texture with a light crunch, along with a rich chocolate flavor that delights all generations — a recipe that proves that the greatest dishes in culinary history were not born in the kitchens of fancy restaurants but in the kitchens of simple homes that exude the aroma of love.
History and Origins of the Dish
The story of American chocolate chip cookies is one of the most beautiful “happy accident” stories in the history of world cuisine. The beginning dates back to 1938 in the small town of Whitman in the state of Massachusetts, where a woman named Ruth Graves Wakefield ran a small inn with her husband called the “Toll House Inn.” Ruth was a talented cook famous for her homemade desserts that both hotel guests and locals flocked to enjoy.
One day, Ruth was preparing her usual recipe for classic butter cookies, but she decided to try something different. She took a bar of Nestlé Semi-Sweet Chocolate, broke it into small pieces, and added them to the dough. She expected — or perhaps hoped — that the chocolate pieces would melt completely during baking and distribute throughout the dough, turning the entire cookie into a uniformly colored and flavored chocolate cookie. But what happened was different and far more beautiful: the chocolate pieces did not melt completely but maintained their shape and transformed into gooey, melted pockets inside golden, crispy cookies — and thus chocolate chip cookies as we know them today were born.
The guests loved this new invention passionately, and the recipe spread quickly. A local Boston newspaper published the recipe, then it spread throughout New England, and then across all of America. Ruth reached an agreement with Nestlé to publish her recipe on the wrappers of their chocolate bars in exchange for a lifetime supply of free chocolate. In 1939, Nestlé began producing ready-made chocolate chips in their small conical shape that we know today — specifically to make it easier to prepare Ruth’s recipe. That was a defining moment that transformed chocolate chip cookies from a local recipe into a national and then global phenomenon.
During World War II, chocolate chip cookies played an unexpectedly influential role. American soldiers stationed in Europe and the Pacific would receive packages from their families containing batches of the beloved “Toll House” cookies, and they would share them with fellow soldiers from other states and with soldiers from Allied nations. In this way, the cookies became a symbol of homesickness, the taste of home, and the warmth of family in the midst of the hell of war, and they transformed into an unofficial cultural ambassador that introduced the world to American home cooking.
After the war, chocolate chip cookies cemented their place at the heart of everyday American culture. They became an inseparable part of American childhood rituals: the mother baking cookies in the afternoon and the children returning from school to find a hot plate waiting for them with glasses of cold milk on the kitchen table. This image was repeated in thousands of American movies and TV shows until it became a visual icon associated with the concept of a happy “American home.” The cookies also became central to school traditions such as “Bake Sales” — those school bazaars where parents bake homemade treats and sell them to raise donations — and chocolate chip cookies are always the star that sells out first.
Over the decades, the recipe evolved and branched into dozens of versions and variations. Double Chocolate cookies appeared with the addition of cocoa powder to the dough itself, Giant Cookies the size of a full plate, and cookies stuffed with Nutella, peanut butter, or salted caramel. In Europe, chefs reinterpreted the American recipe in their own style — in France, luxurious versions appeared with Valrhona chocolate, Échiré butter, and fleur de sel salt, and in Belgium, premium Belgian chocolate with high cocoa percentages was added. But the original classic recipe — Ruth Wakefield’s recipe from the Toll House Inn — remains the reference and foundation from which all variations spring.
Comprehensive Recipe Card
| Dish Feature | Details |
|---|---|
| Preparation Time | 15 – 20 minutes |
| Cooking Time | 10 – 12 minutes per batch |
| Cooling Time (optional but recommended) | 30 minutes to two hours |
| Total Time | 45 minutes – two and a half hours |
| Servings / Quantity | Approximately 36 – 40 cookies |
| Category | Desserts / Cookies / American cuisine |
| Difficulty Level | Intermediate |
Ingredients and Measurements
| Ingredient | Quantity | Role / Notes |
|---|---|---|
| Unsalted butter, softened (room temperature) | 230 grams (one cup) | The backbone of the cookies — provides softness, rich creamy flavor, and contributes to crispness as it melts in the oven |
| Fine white sugar | 150 grams (¾ cup) | Provides sweetness and contributes to the outer crispness — helps the cookies spread during baking |
| Light or dark brown sugar (packed) | 165 grams (¾ cup) | A secret weapon — the molasses in it provides moisture, softness, and a warm caramel flavor that is indispensable |
| Large eggs | 2 | Binds the ingredients together and provides structure and texture — the yolk adds richness and the white adds lightness |
| Pure Vanilla Extract | 2 teaspoons | Adds aromatic depth that balances the sweetness of the sugar and the bitterness of the chocolate — use pure vanilla, not artificial |
| All-Purpose Flour | 345 grams (2¾ cups) | The structural base of the cookies — the gluten in it provides structure and cohesion |
| Baking soda | 1 teaspoon | The leavening agent — reacts with the acidity of the brown sugar to produce bubbles that give the cookies a slight rise and airy texture |
| Fine salt | 1 teaspoon | Not for saltiness but to enhance all flavors — it highlights the sweetness of the sugar, the bitterness of the chocolate, and the flavor of the butter |
| Semi-Sweet Chocolate Chips | 340 grams (two cups) | The star of the show — choose high-quality chips with a cocoa percentage between 50% and 60% for the perfect balance between sweetness and bitterness |
| Chopped walnuts or pecans (optional) | 150 grams (one cup) | Adds a contrasting crunch and warm, nutty flavor — lightly toasting them before adding doubles their flavor |
Detailed Preparation Steps
Stage One: Preparing the Butter and Sugar Mixture (Creaming)
This stage is the foundation upon which everything is built — and it deserves your full patience and attention.
Place the softened butter in the bowl of an electric mixer (or in a large bowl if using a hand mixer). The butter should be at room temperature — soft enough that your finger sinks into it easily but not melted or shiny. This temperature is very important because butter that is too cold will not mix well with the sugar, and melted butter will produce flat, spread-out cookies instead of thick, tall ones.
Add the white sugar and brown sugar to the butter and begin beating on medium speed. Continue beating for a full 3 to 5 minutes — and this is longer than most people think. During this time, the sugar crystals cut small air pockets into the butter, and the mixture gradually transforms from a dense yellow mass into a light-colored, fluffy, airy creamy mixture. This process is called “Creaming” and it is responsible for a large part of the cookies’ final texture — those air pockets trapped in the butter will expand in the oven’s heat and give the cookies their rise and lightness.
Add the first egg and beat until it is fully incorporated into the mixture — about 30 seconds. Then add the second egg and beat in the same way. Adding the eggs one at a time rather than all at once ensures better blending and a stronger dough structure. Finally, add the vanilla extract and beat for a few seconds until it is distributed throughout the mixture. At this stage, an amazing aroma will waft from the bowl — the combination of butter, brown sugar, and vanilla is perhaps the most wonderful scent a kitchen on earth can produce.
Stage Two: Incorporating the Dry Ingredients
In a separate bowl, place the flour, baking soda, and salt and mix them with a hand whisk or fork so the ingredients are evenly distributed. This simple step ensures that you won’t find pockets of baking soda in the finished cookies that give an unpleasant metallic taste or pockets of overly salty salt.
Add the dry ingredient mixture to the butter mixture in two or three additions, mixing on low speed after each addition until the flour nearly disappears — no more. Over-mixing at this stage is the most common mistake beginners make. Excessive mixing activates the gluten proteins in the flour and transforms the cookies from soft and tender to chewy and tough like a dry biscuit. The golden rule is: stop mixing as soon as the last visible trace of flour disappears.
Finally, add the chocolate chips and toasted nuts (if you chose to use them) and fold them into the dough with a wooden spoon or rubber spatula using gentle folding motions. Distribute them evenly throughout the dough without excessive stirring.
Stage Three: Chilling the Dough (The Secret Step)
This step is technically optional — but it is the difference between a good cookie and an exceptional one. Cover the dough bowl with plastic wrap and place it in the refrigerator for no less than 30 minutes, preferably one to two hours. Chilling the dough does three important things simultaneously: it solidifies the butter, preventing the cookies from flattening and spreading excessively in the oven so they remain thick and tall; it allows the flour to fully absorb the moisture, making the texture more cohesive; and it allows the flavors to marry and meld, becoming deeper and more complex. Some professional chefs chill the dough for 24 to 36 hours to achieve the best possible result.
Stage Four: Shaping the Cookies and Baking
Preheat the oven to 180°C (350°F) and position the rack in the middle. Line two baking sheets with parchment paper or silicone mats.
Remove the dough from the refrigerator. Using a cookie scoop or a regular tablespoon, scoop a portion of dough about the size of a large walnut — approximately two tablespoons per piece — and roll it into a ball between your palms. Place the balls on the baking sheet leaving at least 5 centimeters of space between each one because the cookies will spread during baking. If you want a professional look with beautiful cracks on the surface, press each ball slightly with the palm of your hand to form a thick disc.
Place the baking sheet in the oven and bake for 10 to 12 minutes. Here comes the most important secret of all: remove the cookies from the oven when their edges look golden but their center still appears soft and undercooked — as if the baking isn’t complete. This is not a mistake; it is exactly what you want. The cookies will continue to cook from the residual heat stored in the baking sheet after leaving the oven (this is called “Carry-Over Cooking”), and the result will be crispy golden edges that break gently and a soft, moist inner center that melts in the mouth.
Stage Five: Cooling and Serving
Leave the cookies on the baking sheet for 5 minutes after removing them from the oven — during these minutes the texture firms up and they become easier to move. Then carefully transfer the pieces to a wire cooling rack and let them cool for an additional 10 minutes. The cookies are at their best when warm — not too hot and not completely cool — that moment when the chocolate inside is still gooey and melted but the piece is firm enough to hold in your hand without falling apart.
Serve them with a large glass of cold whole milk — this is the classic American duo that nothing can rival — or with a cup of hot black coffee whose deep bitterness cuts through the sweetness of the cookies, or with a scoop of vanilla ice cream to make what is known as the famous “ice cream sandwich.” A tip from Atayeb: they can be served with a glass of cold milk or coffee for an authentic American experience that transports you directly to a warm American kitchen on an autumn evening.
Secrets of Success and Scientific Tips
The balance between white sugar and brown sugar is the key to the texture. White sugar absorbs moisture and helps the cookies spread and crisp, while brown sugar retains moisture thanks to the molasses and provides softness and chewiness. Increasing the proportion of brown sugar produces softer, chewier cookies, and increasing the proportion of white sugar produces crispier, flatter cookies. The recipe listed here uses similar proportions to achieve the perfect balance between both worlds.
The temperature of the butter dramatically affects the final result. Softened butter (room temperature) produces thick, tall cookies. Melted butter produces flat, chewy cookies with a toffee flavor. Cold, cubed butter produces crispy cookies closer to biscuits. There is no wrong method — but you need to know what you want before you begin.
Over-mixing after adding the flour is the number one enemy of perfect cookie texture. Every extra second of mixing activates more gluten and transforms the cookies from tender and crumbly to rubbery. Mix until the flour disappears — and not a second more.
The oven temperature must be precise. Use an oven thermometer because most home ovens differ from the temperature displayed on their screens by 10 to 25 degrees. This small difference makes a huge difference between a perfectly golden cookie and one with burnt edges and a raw center.
A pinch of fine salt (fleur de sel or coarse sea salt) sprinkled over the cookies just before they enter the oven is the touch that professional chefs use to elevate all the flavors to another level. The salt highlights the sweetness of the caramel, the bitterness of the chocolate, and the richness of the butter all at once.
Frequently Asked Questions About the Recipe
Can dark chocolate be used instead of semi-sweet?
Absolutely. Dark chocolate with a cocoa percentage of 70% or higher gives a deeper, less sweet, and more complex flavor. In this case, it is preferable to chop it by hand with a knife rather than using ready-made chips — the irregular pieces produce varying-sized pockets of melted chocolate that create a more exciting experience in every bite.
Can a vegan version be made?
Yes. Replace the butter with high-quality vegan butter or solidified coconut oil, and replace the eggs with alternatives such as ground flaxseeds soaked in water (one tablespoon of ground flaxseeds + 3 tablespoons of water = one egg), mashed banana, or aquafaba (chickpea water). The result may differ slightly in texture but remains very delicious.
Can the cookies be stored?
Yes. Baked cookies can be kept in an airtight container at room temperature for up to 5 days. For longer storage, you can freeze the unbaked dough balls on a baking sheet and then transfer them to a freezer bag — and when desired, bake them directly from the freezer with an additional two minutes of baking time. This method means you can enjoy fresh, hot cookies straight from the oven at any moment without needing to prepare the dough from scratch.
Approximate Nutritional Value
| Nutrient | Value per Serving (one cookie) | Additional Notes |
|---|---|---|
| Calories | 180 – 220 calories | Depends on the size of the piece and the amount of chocolate and nuts |
| Protein | 2 – 3 grams | From the eggs, flour, and nuts if added |
| Fat | 10 – 13 grams | Primarily from the butter and chocolate chips |
| Carbohydrates | 22 – 28 grams | From the flour and sugars — the primary energy source in each piece |
| Fiber | 1 – 2 grams | From the dark chocolate and nuts — increases with higher cocoa percentage |
Chocolate chip cookies are an energy-rich treat suitable as a snack or a moderate dessert. To reduce calories, you can use half the amount of chocolate chips, replace part of the butter with Greek yogurt, or use whole wheat flour to increase fiber, keeping in mind that these modifications will affect the texture and flavor.
Motivational Conclusion
American chocolate chip cookies are more than just a dessert — they are a ritual, a memory, and a feeling of warmth that no words can describe as precisely as that first bite of a piece fresh out of the oven. That moment when your teeth meet the crispy edge, then sink into the warm, soft center, and collide with a melted chocolate pocket that bursts with a dark flavor blended with brown sugar caramel, the richness of butter, and a hint of vanilla — in that exact moment you understand why this simple recipe has endured for more than eighty years and why it will endure for eighty more.
It is the recipe that proves that real magic in cooking does not require twenty exotic ingredients or complicated techniques — it only requires good ingredients, two warm hands, and a heart that loves what it creates. Chocolate chip cookies are the perfect recipe to start with if you are a beginner in baking, and the recipe you always return to no matter how skilled you become because it reminds you of the origin of everything: the joy of making something delicious with your own hands and sharing it with those you love.
Try preparing American chocolate chip cookies following the steps from Atayeb to achieve the perfect texture between softness and crunch, and a rich chocolate taste that delights every member of the family. Heat up the oven, take the butter out of the refrigerator, and get ready for an aroma that will fill your home with warmth and happiness! 🍪